Thursday, November 21, 2013

Poodle-less Poodle Skirts


A few years ago, my sister (Borg #7 of 8) bought some fabric and patterns to make costumes for one of our nieces.  That niece has since outgrown dress-up, but the fabric was still around.  She gave it to me in hopes that I might find the time to make up the garments before we ran out of nieces little enough for dress-up play.

One of the costumes was a poodle skirt  for which she had bought pink felt.  I happened to have some lime polyester green felt sitting around from a time when I had planned to make a tree skirt with it.  (After purchasing the felt, I realized this fabric choice may have been fine in the 70s but fleece would be a better fabric for a tree skirt since it is much more washable, has a nicer hand and comes in a greater variety of colors and patterns.)

So I had it in my mind that I had the fabric on hand to make a pair of poodle skirts some day when Maggie announced that the theme for her birthday party this year would be a Cat and Dog Birthday “Pawty.” Now "some day" had a deadline.
No poodles here. 

Neither Maggie nor Lily are really poodle people, so I was inspired to use the cat appliqué in the pattern for Lily and the Scottie for Mags. 

I envisioned designing the skirts to coordinate by using this lime green polka dotted ribbon (from my stash) to make a bow around the neck on the pink skirt and a matching hot pink ribbon for the green one. I had pale pink soutache on hand from the Victorian velvet coat which was perfect for the traditional leash. (Probably the one traditional element left by the time I was done)   The cat appliqué pattern included a face, but it looked too much like those mean Siamese cats in Lady and the Tramp.  I came up with this design for green eyelashes and a little hot pink embroidered nose which I adapted to the Scottie as well.  (These are clearly not faceless Amish pets.)
Detail of embroidery and matching ribbons

I mailed off the skirts in time for the party. Their mother (Borg #6 of 8) reported to me that it is impossible to wear a poodle skirt and not spin around in it until you’re dizzy if you are Maggie.  


Dizzy Maggie kerplops with her Scottie skirt


Here, she and her friend Caitlin take the skirts for a spin. (Lily is boycotting dresses at the moment.)  
 
They just can't help themselves.
I wonder what it will take to get me to make the other costumes my sister entrusted me to finish for her.  Tick-tock.  Maggie and Lily are not getting any younger... 

Sunday, November 17, 2013

Victorian Ensemble for Dollies


Gown, underthings, muff and hooded coat

After making the Colonial doll clothes I was inspired to move up a century and make a Victorian ensemble. 


Undershirt and pantaloons
This pattern included lovely underwear that I trimmed with lavender beribboned laces.  There was no corset or bustle with this outfit, but I doubt the doll minds.


I went into my stash for another tiny calico print and came upon this pale blue fabric with royal blue and hot pink flowers among green leaves.  This is a fairly plain skirt and blouse, which is probably a reasonable every-day garment.


Muff and hooded velvet coat
It was this hooded coat that really inspired me to make a Victorian outfit.  How could I resist making a matching muff?  I had such fun plucking this deep green cotton velvet from my stas
h, discovering a pretty blue polyester lining fabric and putting together the pink and blue trim to coordinate with the pink and blue of the dress.

Back hood detail

Here, a dolly models the ensemble
Undies, dress and coat with muff

Next up for these dolls?  Something from the 20th century?

Wednesday, November 13, 2013

Please, please, please Cross-stitch

Trust me, in person it looks great.
A dear friend has always loved the combination of black and hot pink. And also The Smiths.  So I made this for her and had it framed at AC Moore which was much cheaper (and had the right hot pink matte) than Michaels:


Please, please, please Let me get what I want this time.
I used a variegated hot pink embroidery thread.  I like the effect it had against the black Aida cloth. I also love the contrast of cross-stitching with Morrissey quotes.  Maybe I will get around to stitching up a Princess Bride sampler.  (Imagine a border of ROUSes!)


I went "old-school" and found some graph paper to design the pattern based on an alphabet I found in a cross-stitch book. I imagine there is some way to do it on a computer, but this worked just fine.  I took this picture because I was amused by how huge the pattern was and how small the final product is worked in Aida cloth. 
Large graph, tiny Aida cloth
I hope Morrissey appreciates how inspiring we find him. 

Tuesday, November 12, 2013

In Honor of Great Britain's 2 Million Spinsters on Armistice Day

Aunt Carrie, American Spinster, Sidesaddle Horsewoman circa 1900.
In addition to honoring those who served in the military, I think it is important to also recognize some heroines of mine who were created by the devastation of the first World War: the spinster generation of Great Britain.  (American spinsters were not as profoundly affected because single male immigrants made up for many of the homegrown numbers who went to war and never came back .)

With so many men
lost to the war, this was the first generation of women who had no hope of marrying. So what did they do? They became suffragists and social workers, writers and secretaries. They infiltrated the domains men had once completely dominated because they did not have the distractions of husbands and children, but had to make a living somehow. So many progressive social movements have their roots in a generation of spinsters with the time and energy to fight for the most vulnerable in society. They were veterans of the homefront and deserve recognition as well. 


Their story is told in the book Singled Out by Virginia Nicholson. 


It's a fascinating book. Until that generation, spinsters were entirely dependent upon their fathers or brothers. Thanks to the development of the typewriter and the nursing profession, they were able to make their own (albeit minimal) livings. Higher education was available to women for the first time. With so many men dead or diminished by injuries and PTSD, these women filled vacancies and forged new lives of their own with no map or handbook. They didn't have kids, so they poured their creativity and nurture into improving society and their lot in it. 

Monday, November 11, 2013

Horsies and Kitties Jumpers


Horsey and Kitty Jumpers


Horsies galloping across the skirt
Lily had a horse-themed birthday party last year.  Eventually I had the vision to make over a vintage dress into a jumper with horses galloping across it.  


I used Butterick 3762 (the same pattern I used for the flowergirl dresses) and lined it with a blue and white striped fabric from my stash.   

 
Kitty jumper


Not to leave Maggie out, I made a kitty jumper for her using McCall’s 4006 from this plaid fabric in my stash.  (The pink was left over from the Doctor Who skirt)   


These cat faces are so cute with their button eyes,  embroidered features and rick rack whiskers.   I used dyed shell buttons for the eyes and sewed them on backward so they would have a mottled effect.
Detail of horses and kittiies
 
Maggie models the kitty pocketed jumper
Maggie liked this jumper enough that she chose to wear it for her second day of school this year.  


Lily's horsey jumper

Monday, November 4, 2013

Felicity's Colonial Dress (with bumroll!)


Several years ago, my cat Felicity sent a little American Girl doll  to Maggie and Lily because the doll shared her name.  (Fergus sent them his namesake Tank Engine too.)  The Felicity doll’s story is set in the American colonial period, so she seemed especially appropriate to send as a gift from Philadelphia where there is so much rich history of the American colonies and the Revolutionary War. 

Sadly, American Girl has retired Felicity. I decided that Lily and Maggie needed some Colonial dress-up clothes for their American Girl-sized dolls. (Or possibly their Raggedies) .   I love the process of making doll clothes.  I first learned to sew making outfits from commercial patterns for my Velvet and Mia dolls. 

I think you can really learn to appreciate history when you look at the clothing and learn about the lives of women and girls of the past.  When I was in grade school, I made Pilgrim and Native American clothes for Velvet and Mia for a school project. I don’t remember much else from 5th grade, but I do remember researching and making those costumes.

Mop cap, bodice, skirt, bumroll, shawl, pantaloons and apron


I used McCall’s pattern3627  and dug into my stash to find a suitable tiny print for the skirt and bodice.  I think I bought this pink beribboned fabric in the 1980s when I was working at So-Fro.  I had some tiny lace in my collection and even found a pink one to use on the edge of the sleeve.


Historically accurate bumroll, apron & shawl. Not pantaloons. 

I love this pattern because it includes under- garments. When we were kids, it seemed like there was never enough underwear for all the dollies.  Not only did this have not-exactly-historically-accurate pantaloons, but the pattern included a bum roll which really gives the skirt an historic shape.  (The pantaloons would have been crotchless to be historically accurate.  I am not sure Lily and Maggie would be all that impressed by that kind of authenticity)
Detail of bumroll shaping


Princess-seamed bodice with pink lace and waist point.


Here is a close-up of the bodice which has princess seaming and comes to this tiny point at the waist. The skirt is actually attached to an under-bodice which, while not historically accurate, makes the outfit work better for the doll.  And let’s face it, there is not going to be a lot of historically accurate play here.  So that skirt can also be worn as a modern-day jumper if one were so inclined.

The outfit is topped off with an apron, shawl and mop cap.  I made the cap reversible from plain white with a pink bow to pink with a blue bow.  Apparently I am still channeling Sleeping Beauty.

The girls were delighted to have new outfits for their dolls.  You can really never have enough doll clothes.   I am so grateful to my sisters who had daughters I could sew doll clothes for.

Here is one of Lily’s dolls modeling the finished product along with the back view of the outfit (including the reverse of the mop cap.)   
It wasn't long before a Raggedy was wearing this outfit.

Friday, November 1, 2013

Flower Girls in Kansas City


Last summer, I offered to make flower girl dresses for my friend Georgiane as a wedding present.  The only problem was that her flower girls are in Kansas City and I am in Philadelphia. 

 
Libby models the original
She went shopping and found a style of dress that she liked very much and sent me this picture on this adorable little model, Libby.  She also sent some beautiful silk to make the dresses from. 


I used this pattern as a base while lengthening the bodice, but the challenge was to figure out how to replicate those pintucks and ruffles. 


Maggie and Lily play dress-up in the muslins


So I made a pair of muslins and sent them to Georgiane so she could approve them and try them on the little girls to see how they fit.  For some reason she not only sent pictures of her girls wearing the “dress rehearsals” but she sent the dresses back.  (Poor harried bride)  


Lily pretends her First Communion in tucks and ruffles


 I ended up sending the muslins to my nieces who are about the same size as her flower girls and they had a grand time using them for dress-up.   Lily even got hold of her aunt’s First Communion veil to accessorize her outfit.


Thanks for your help, Grandma Betty!

 I cut the dresses out of the fabric she sent and had only these snippets of fabric left over.  Talk about cutting it close!  

As I went to cut the dresses out, I was really struggling, so I asked Georgiane’s Grandma Betty for help.   She really inspired me.  I know Grandma Betty would have made the dresses herself if she had lived to see this wedding.  I felt like I had her on my shoulder through the whole process.  Grandma Betty was love. 


The finished dresses


Here are the finished dresses.  I fully lined them in soft pink silk because I could imagine being a little girl and not wanting anything itchy.  And besides… pink! 
Soft pink lining


Here are the flower girls at the wedding.  Disappointingly, they had one of the few chilly rainy October days for it, so the girls needed little cardigans that covered up the pretty rose ribbon hanging down the back.  Still, it was a beautiful wedding and they had washable silk dresses to wear.  I think they match the original pretty closely.
Madison and Libby with flower baskets and cardigans

Tuesday, October 29, 2013

Doctor Who Skirt


A few years ago, my sisters (Borgs # 7 & 8 of 8), my niece and my sister-in-law (there can be only one) became fans of the rebooted Doctor Who.  Despite my British birth, I had only a vague consciousness of the show—mostly through my plethora of certified-geek friends. 

I decided to make a Doctor Who-themed garment for my niece when I discovered Spoonflower carried all kinds of fabrics with geek themes.  Do you know about Spoonflower?  You can design your own fabric and they will print it up for you on a variety of fabrics or even wallpaper or gift wrap. 

Dalek and TARDIS exposed!


I chose this fabric, which sadly no longer appears to be available. (But there are many more Who fabrics now than when I ordered this.)  I had this idea that if I folded the pleats just right, I could hide the Daleks and TARDIS so that they would only be revealed when the wearer was spinning rather like the TARDIS. 


Peek-a-boo pleats


Pink is cute.  TARDIS blue would have been better!

designed the skirt to have a contrasting hem and apron so I could get away with using just a yard of fabric in the pleated section.  I found this hot pink fabric to coordinate with the coppery-rust of the Spoonflower fabric.  The other fabric I seriously considered was a royal blue. Of course I opted for pink at the time.   


(I have since become a fan of the show and regret I didn’t make the contrasting sections the official TARDIS blue.)


Still, I hear my niece liked the skirt very much and loves to wear it with leggings.  Here she is modeling it.  She looks pretty happy.  And I hear her geek-girl friends are jealous.


Monday, October 28, 2013

Raggedy Sleeping Beauty


American Girl-sized doll modeling PINK!


Last year, my niece Maggie had a princess-themed birthday party.  My sister (Borg #7 of 8) had recently introduced her to Disney’s Sleeping Beauty. It’s one of my favorite Disney princess movies despite its lack of a feminist message. It has that glorious Tchaikovsky-inspired score, beautifully designed backgrounds and the most terrifying Disney villain of all: Maleficent. Of course best of all is her beautiful PINK gown. 

Obviously, I take the side of Flora, one of the 3 fairies who raise Aurora secretly in their little cottage in the woods.  Borg # 7 of 8, however, sides with Meriweather who insists the dress should be blue.   


Out of print. New version available


I had this pattern in my collection and decided to make the Sleeping Beauty gown for Maggie’s American Girl doll.  In light of the controversy. It made sense to me to make a reversible version of the dress so that Flora and Meriweather could each have her way. 

I found perfect fabrics for it in the Jo-Ann Halloween collection – two tones of each color with glitter embedded in the fabric. I made two dresses separately and then attached them when I applied the collar.  I simply folded up the hems of the sleeves and sewed those together along with the hem of the skirt.  (I skipped the ribbon along the hem because it is not authentic to the dress in the film.) The back is closed with strips of Velcro. 


Meriweather (and Borg #7 of 8) say "Blue!"
I think the dress came out beautifully and thought it would be fun for Maggie to switch back and forth between pink and blue.   

Flora and I say "PINK!"


What I didn’t anticipate was that she decided her Raggedy Maggie needed to wear this dress.  The size is actually fairly close, but Raggedy hands are somewhat bigger than American Girl hands and I imagine by now the dress looks a bit more like Cinderella’s rags than Sleeping Beauty’s beautiful 16th birthday present gown.
Maggie with her reversible Raggedy Sleeping Beauty


Fergus provided inspection services, although from this picture, it appears he is considering trying on the gown himself.  I had no idea he was interested in cross dressing.  But really, who can resist a beautiful princess costume?
Fergus would have tried it on if only he had opposable thumbs. 


Simplicity has re-printed this Disney Princess pattern as #1581.  Get it while it's hot!  (Or wait til it goes on sale for $1.99 at a large crafts & fabric chain)


Saturday, October 26, 2013

Hoard-ganizing the Fabric Stash


Long time no blog.


Going through my collection of photos, I realize I have made lots of things in the last year, I just didn’t blog about them, though I have posted many of them on Facebook.  I have been trying to re-create a life for myself and hit a lot of dead ends. Something has to turn around soon, right?


In the meantime, I have been trying to get my space organized.  I have a fabric stash that has its origins in my days after college when I worked for So-Fro fabrics.  Thanks to input from Pinterest, I managed to develop a system to get control over my fabric stash and am really happy with the process I put together.  The origins of this system can be found on my Pinterest board, hoard-ganizing , but I haven’t seen anyone put these elements together in quite this way.

EXPEDIT Before
I have had my beloved 4 x 4 EXPEDIT shelving unit for a number of years. This picture will give you an idea of the “before” way I had been using it. 

Much as I love looking at all the craft and sewing stuff, I found that there was something cluttered about this display, not to mention the exposure to light and dust. 

I decided I needed to re-think this chaos and went out to find containers that would fit both the EXPEDIT and my budget.  


EXPEDIT After

I bought a few hot pink DRÖNA boxes from IKEA. They fit the cubbies of the EXPEDIT perfectly and were just 5 bucks each. (Though they are up to $6 now)  By the time I decided to get some more DRÖNAs, they were no longer carrying the pink ones, so I got a couple of green ones along with a pair of matching inserts with doors  that were on clearance.  Of course when I went back to get more green ones, they were discontinued, so I picked up the blue boxes.  These colors are all part of my personal palette, and I actually like the variety of colors in the white unit. 


Now IKEA has brought out a high-gloss 2 x 4 hot pink EXPEDIT.  I want to line every wall of my house with them. (Either that or the teal one.) But I settled for another door insert and a set of drawers in the pink.  (The DRÖNAs are very useful for storing the fabric stash, but some of my crafting materials and reference books are better stored in drawers and behind doors.)


Of course anyone can fill the EXPEDIT with DRÖNAs, but my breakthrough was developing a system to organize, inventory and label the contents of the boxes. 


Binder clip, 1' binder ring holding swatches of contents


As you can see, I attached  a binder clip to the top of the DRÖNA to hold a small binder ring  which holds a set of punched cards with swatches of the contents.  Already this process thrills me because it makes use of office supplies. 


What is it about school supplies and office supplies that bring me to the edge of ecstasy?


With these rings indicating the contents of each box, it is so much easier to find a particular piece of fabric by checking the cards rather than pawing through the boxes to find it.  

Fabric details
I initially made these tags from the leftover business cards I had from my last job.  Eventually I ran out of those.  I tried to buy blank business cards from my local Staples, but found a much better deal getting them from Vistaprint.  I had them made up with a list of content details so I can just cut a swatch and glue it to one side of the card and fill out the card with pertinent information like yardage, where and when I bought it and fiber content.  

Yes, it took a lot of time to cut a swatch, glue it (with either a glue stick or glue runner) measure the fabric, fold it neatly and document it.  But it has saved so much time and money to be able to find out what I already have before going on a fabric store bender. I have been able to combine fabrics from the stash that were bought 20 years apart, but meant to be together.  It was a great project to work on while catching up on Doctor Who.


Swatches ready for a shopping trip
The beauty of this system is that as I use up fabrics, I can just discard or file the associated card.  I can update the yardage if I only use part of it.  I can use the swatches to figure out what combination of fabrics will work for a project.  And most helpful of all, I can clip a group of swatches to a binder ring and take it with me to shop for coordinating fabrics, and notions.  I have brought my swatch ring with me to the fabric store and been asked about it by fellow shoppers as well as the sales people. 


After I made these up, I came across this Swatch Buddy system on line. If you are in no mood to DIY a set, they might be a good solution, but I figure if you are DIYing in fabric, you are probably a dyed-in-the-wool DIYer who wants to make her own individualized swatch cards anyhow. (Especially if you have old business cards lying around which brings the cost down significantly while keeping the cards out of the landfill)
Swatches make contents easy to find.
The other difference between the Swatch Buddy system and mine is that I am using them as a way to label the boxes of my collection, in addition to just having a portable set of swatches.


So just what is in those DRÖNA boxes?  Mostly fabric. One box contains my crafting toaster oven along with polymer clay, clay tools and shrinky dink paper.  One box contains my scrapbooking stuff. Another holds patterns.  I have to get a few more hot pink binder clips and binder rings to finish labeling the blue boxes that don’t have fabric in them. 


Fat Quarters and 1 or 2 yard pieces folded and filed.

Here is what it looks like inside a couple of the fabric boxes.  I am especially pleased with this large collection of fat quarters and one-yard pieces that I have collected to make patchwork.  I used this tutorial as inspiration for how to get all of these odd pieces of fabric folded uniformly.   Using a 6” wide quilting ruler to fold the fabric makes it exactly the right width to make two stacks of fabrics that fit the DRÖNA.  

I got so many fabrics into this box, I had too many cards to fit the 1” binder ring and needed a big 2” one to hold them all.  

Rolled 2-4 yard pieces
 With yardages over a yard or two, I found that rolling the fabric allowed me to tip out the box and get a quick view of the contents. 


Bulky fabrics filed
Bulkier fabrics like flannel and corduroy are folded and stacked in the DRÖNA.  It looks so orderly to me that I just want to start into a new project. 


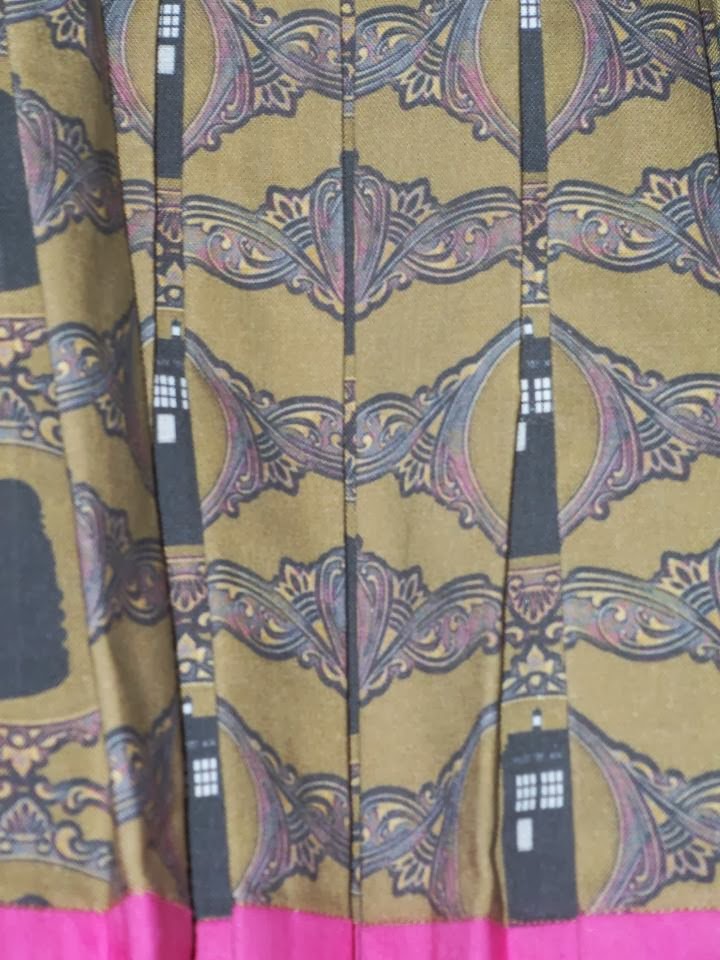
6-yard dress-length  cottons


Of course that EXPEDIT is nowhere near big enough to hold my entire stash.  Here’s the 2" binder ring of swatches for the fabrics stored in this dresser. :)


I hope this inspires you to get some control over a stash gone wild at your place. J